2020.12.05更新:最新版V2ray-core已经移除了XTLS,如果你要使用XTLS技术,推荐用 Xray一键脚本
今天抽空把支持V2ray最新VLESS协议一键脚本弄完了。本次的V2ray一键脚本功能强大,支持常规VMESS协议、VMESS+websocket+TLS+Nginx、VLESS+TCP+XTLS、VLESS+TCP+TLS等多种组合,支持CentOS 7/8、Ubuntu 16.04以上、Debian 8以上系统,以及相关衍生系统。
注意:目前CentOS7系统已经到生命周期,不建议使用该系统,可能会导致脚本运行失败!建议使用Debian或者Ubuntu系统。
V2ray VLESS+TCP+XTLS一键脚本
本V2ray一键脚本使用步骤如下:
1. 准备一个境外服务器,想服务器速度快请参考 搬瓦工VPS购买教程 或从 CN2 GIA VPS商家推荐 选购,想ip被封后免费换请参考:购买vultr服务器超详细图文教程。
如果用VMESS+WS+TLS或者VLESS系列协议,则还需一个域名。对域名没有要求,国内/国外注册的都可以,不需要备案,不会影响使用,也不会带来安全/隐私上的问题。购买域名可参考:Namesilo购买域名详细教程。
值得一提的是本V2ray一键脚本支持ipv6 only服务器,但是不建议用只有ipv6的VPS用来科学上网。
2. 如果vps运营商开启了防火墙(阿里云、Ucloud、腾讯云、AWS、GCP等商家默认有,搬瓦工/hostdare/vultr等商家默认关闭),请先登录vps管理后台放行80和443端口,否则可能会导致获取证书失败。此外,本脚本支持上传自定义证书,可跳过申请证书这一步,也可用在NAT VPS上。
3. ssh连接到服务器。Windows系统请参考 Bitvise连接Linux服务器教程,mac用户请参考 Mac电脑连接Linux教程。
4. 复制(或手动输入)下面命令到终端:
bash <(curl -sL https://raw.githubusercontent.com/daveleung/hijkpw-scripts-mod/main/xray_mod1.sh)按回车键,将出现如下操作菜单。如果菜单没出现,CentOS系统请输入 yum install -y curl,Ubuntu/Debian系统请输入 apt install -y curl,然后再次运行上面的命令:
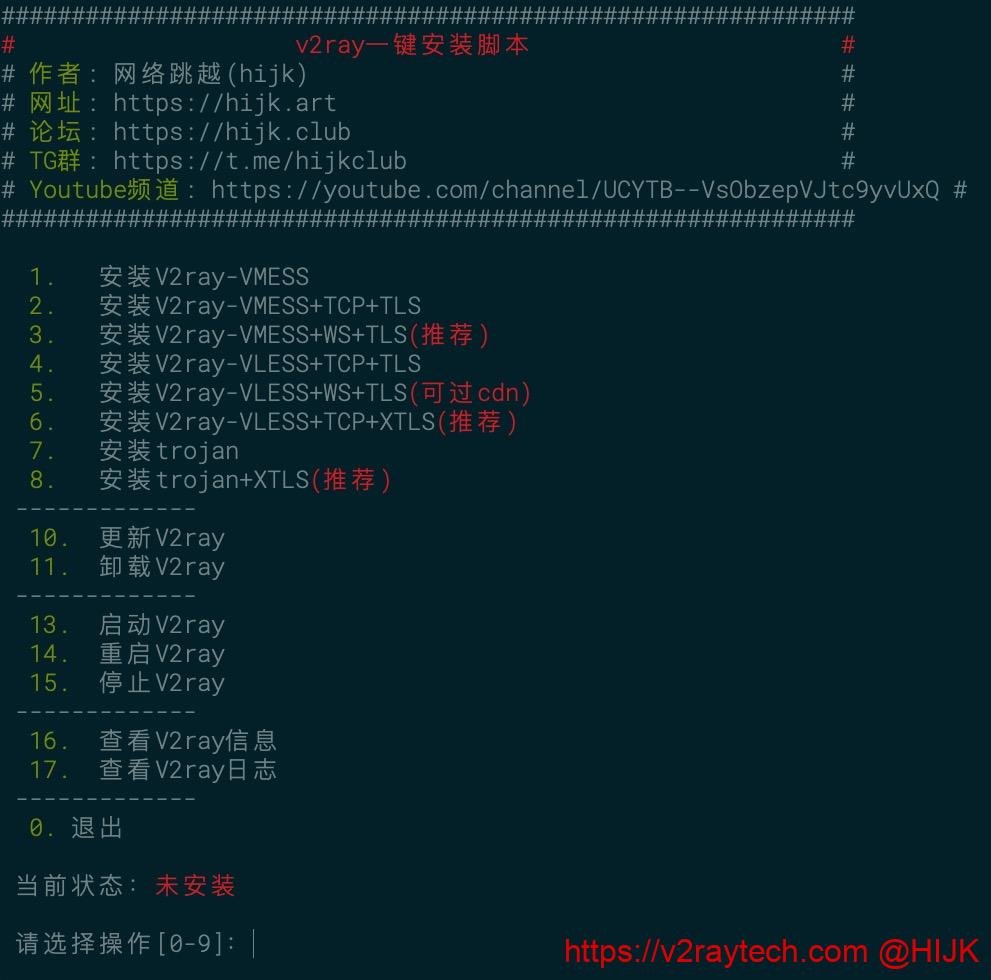
V2ray一键脚本安装菜单
目前V2ray一键脚本支持以下功能:
- VMESS,即最普通的V2ray服务器,没有伪装,也不是VLESS
- VMESS+KCP,传输协议使用mKCP,VPS线路不好时可能有奇效
- VMESS+TCP+TLS,带伪装的V2ray,不能过CDN中转
- VMESS+WS+TLS,即最通用的V2ray伪装方式,能过CDN中转,推荐使用
- VLESS+KCP,传输协议使用mKCP
- VLESS+TCP+TLS,通用的VLESS版本,不能过CDN中转,但比VMESS+TCP+TLS方式性能更好
- VLESS+WS+TLS,基于websocket的V2ray伪装VLESS版本,能过CDN中转,有过CDN情况下推荐使用
- VLESS+TCP+XTLS,目前最强悍的VLESS+XTLS组合,强力推荐使用(但是支持的客户端少一些)
- trojan,轻量级的伪装协议
- trojan+XTLS,trojan加强版,使用XTLS技术提升性能
注意:目前一些客户端不支持VLESS协议,或者不支持XTLS,请按照自己的情况选择组合
5. 按照自己的需求选择一个方式。例如6,然后回车。接着脚本会让你输入一些信息,也可以直接按回车使用默认值。需要注意的是,对于要输入伪装域名的情况,如果服务器上有网站在运行,请联系运维再执行脚本,否则可能导致原来网站无法访问!
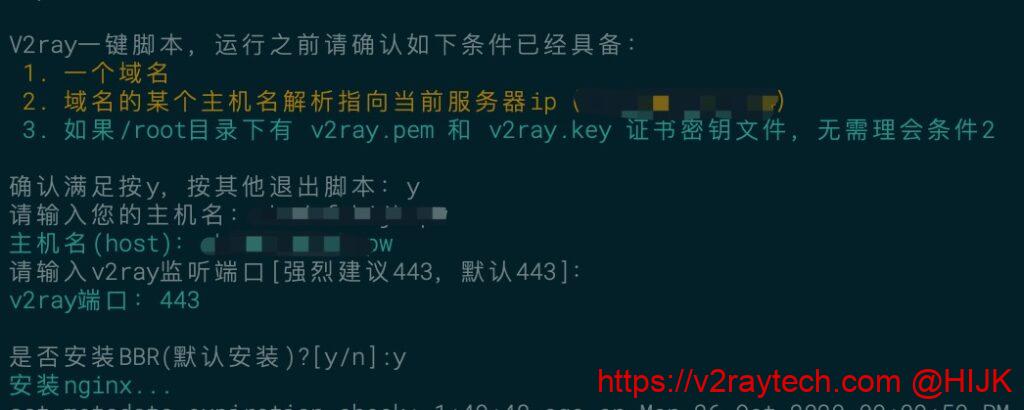
VLESS+TCP+XTLS一键脚本输入信息
6. 脚本接下来会自动运行,一切顺利的话结束后会输出配置信息:
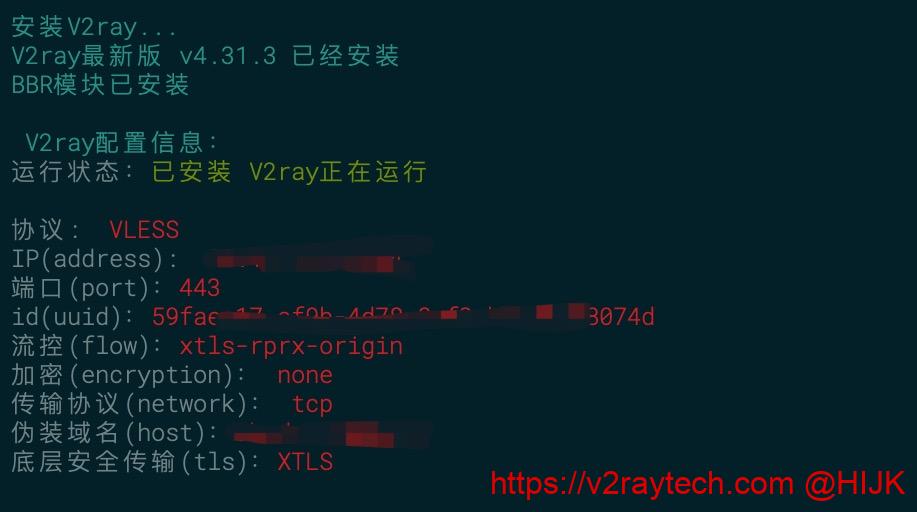
VLESS+TCP+XTLS一键脚本输出信息
注意,脚本不适用最新版,原因是脚本在安装v2ray过程中,第822行默认从(https://github.com/v2fly/v2ray-core/releases/)抓取最新版本。解压后cp到对应位置,目前的最新版本为v5.1.0。该版本解压后,没有v2ctl文件,copy失败后,导致脚本意外终止,请作者予以修正。
脚本未修正前的临时解决方法:
wget https://raw.githubusercontent.com/daveleung/hijkpw-scripts-mod/main/v2ray_mod1.sh
chmod a+x v2ray_mod1.sh
vi v2ray_mod1.sh
(将822行中的${NEW_VER}修改为v4.45.2)
./v2ray_mod1.sh
到此服务端配置完毕,服务器可能会自动重启(没提示重启则不需要),windows终端出现“disconnected”,mac出现“closed by remote host”说明服务器成功重启了。
对于VLESS协议、VMESS+WS+TLS的组合,网页上输入伪装域名,能正常打开伪装站,说明服务端已经正确配置好。如果运行过程中出现问题,请在本页面下方查找解决方法或留言。
V2ray一键脚本注意事项
服务端配置好后,如果想使用CloudFlare等CDN中转(必须是WS版才可以),请参考:使用cloudflare中转流量,拯救被墙ip。
本脚本默认使用的加速技术是BBR,换成魔改BBR/BBR Plus/锐速清参考:安装魔改BBR/BBR Plus/锐速(Lotserver)。
如果伪装站类型没有你满意的,比如你想搭建WordPress博客,请参考:V2ray伪装建站教程。
对于使用TLS的方式,脚本默认会申请域名证书,证书存放在和V2ray配置文件同一个文件夹内(即/etc/v2ray目录下)。证书会自动更新,如果客户端突然无法使用,请打开伪装网站查看是否能正常打开。如果证书已过期,请再次运行上面的脚本重新配置。
最后,刚搭建好V2ray后不要猛上流量,否则会导致被限速、端口被墙,严重可能导致ip被墙。
接下来是配置客户端,下载客户端和配置教程请参考:
祝大家使用愉快。如有问题请在页面下方留言。
域名未解析到当前服务器IP(ipv4:. / ipv6:. )!
用网页上最新的脚本再试试
ubuntu 18.04,用wget 链接的脚本安装完成了。
但是浏览器输入域名打不开,什么也没有
systemctl status v2ray.service 看了一下,
有提示一串类似 proxy/vless/inbound: failed to find the default “alpn” config
的warning
请问这是需要找一下 alpn 文件吗
要用xray内核
噢噢已解决。换了一个服务器,用更新版的ubuntu,脚本一次装成了。
虽然也不明白是为什么哈哈哈
大佬求助!
本来好好用几天,一直没有什么事,今天突然连不上外网了。我还以为又被封了,安装的是VLESS+TCP+XTLS模式,我赶紧上服务器看
systemctl status xray.service
还是那个报错
2023/01/31 02:17:04 [Warning] [1777034432] app/proxyman/inbound: connection ends > proxy/vless/inbound:failed to find the default “alpn” config
有一串四个 Warning
由于我之前确实是能正常用的,它突然出现这个问题,我也晕了
望大佬求助!!
应该不是客服端内核问题,我用的v2rayN-v6.6
四个内核都尝试了,V2fly,sagerNet,Xray,V2fly_v5
试试低版本的v2rayN客户端
大佬好,我分别用本脚本的VMESS+WS+TLS和trojan+XTLS分别安装了,顺利运行,但用https://www.ssllabs.com/ssltest/analyze.html验证,用VMESS+WS+TLS安装的是A级,而trojan+XTLS则是B即,不知道什么原因?另外想问下这个证书是否会自动更新?非常感谢大佬为我这种小白做出的贡献!
app/proxyman/outbound: failed to process outbound traffic > proxy/vmess/outbound: failed to find an available destination > common/retry: [dial tcp xxx.xxx.xx.xx:12980: connect: connection refused] > common/retry: all retry attempts failed
客户端报错这个是什么原因呀?我服务器和客户端里配的应该都是vless
服务端没有启动,或者防火墙没有放开
多谢大佬 已解决
你好大佬 我这边第一次安装成功后伪装站可以正常打开 之后我想换成可以爬虫 我就重新安装了 也提示安装成功了 但是伪装站无法打开了 重新安装几次也是同样问题
系统debian10,安装V2ray-VLESS+WS+TLS(可过cdn),安装完后反馈v2ray启动失败,请检查日志或查看端口是否被占用!
重装了几次,不管是443端口还是其它端口都是启动失败,伪装域名能正常打开
V2ray运行状态:已安装 未运行
以下是日志
— Logs begin at Fri 2023-01-06 12:43:16 UTC, end at Fri 2023-01-06 13:17:56 UTC. —
Jan 06 13:17:56 Tmh227423367982 v2ray[11601]: A unified platform for anti-censorship.
Jan 06 13:17:56 Tmh227423367982 v2ray[11601]: Failed to start: app/proxyman/inbound: failed to listen TCP on 40286 > transport/internet: failed to listen on address: 127.0.0.1:40286 > transport/internet/websocket: failed to listen TCP(for WS) on 127.0.0.1:40286 > listen tcp 127.0.0.1:40286: bind: cannot assign requested address
Jan 06 13:17:56 Tmh227423367982 systemd[1]: v2ray.service: Main process exited, code=exited, status=1/FAILURE
— Subject: Unit process exited
— Defined-By: systemd
— Support: https://www.debian.org/support
—
— An ExecStart= process belonging to unit v2ray.service has exited.
—
— The process’ exit code is ‘exited’ and its exit status is 1.
Jan 06 13:17:56 Tmh227423367982 systemd[1]: v2ray.service: Failed with result ‘exit-code’.
— Subject: Unit failed
— Defined-By: systemd
— Support: https://www.debian.org/support
—
— The unit v2ray.service has entered the ‘failed’ state with result ‘exit-code’.
Jan 06 13:17:56 Tmh227423367982 systemd[1]: v2ray.service: Service RestartSec=100ms expired, scheduling restart.
Jan 06 13:17:56 Tmh227423367982 systemd[1]: v2ray.service: Scheduled restart job, restart counter is at 5.
— Subject: Automatic restarting of a unit has been scheduled
— Defined-By: systemd
— Support: https://www.debian.org/support
—
— Automatic restarting of the unit v2ray.service has been scheduled, as the result for
— the configured Restart= setting for the unit.
Jan 06 13:17:56 Tmh227423367982 systemd[1]: Stopped V2ray Service.
— Subject: A stop job for unit v2ray.service has finished
— Defined-By: systemd
— Support: https://www.debian.org/support
—
— A stop job for unit v2ray.service has finished.
—
— The job identifier is 2130 and the job result is done.
Jan 06 13:17:56 Tmh227423367982 systemd[1]: v2ray.service: Start request repeated too quickly.
Jan 06 13:17:56 Tmh227423367982 systemd[1]: v2ray.service: Failed with result ‘exit-code’.
— Subject: Unit failed
— Defined-By: systemd
— Support: https://www.debian.org/support
—
— The unit v2ray.service has entered the ‘failed’ state with result ‘exit-code’.
Jan 06 13:17:56 Tmh227423367982 systemd[1]: Failed to start V2ray Service.
— Subject: A start job for unit v2ray.service has failed
— Defined-By: systemd
— Support: https://www.debian.org/support
—
— A start job for unit v2ray.service has finished with a failure.
—
— The job identifier is 2130 and the job result is failed.
安装时也发现了一处nginx的报错
[Fri 06 Jan 2023 01:11:43 PM UTC] Changed default CA to: https://acme-v02.api.letsencrypt.org/directory
[Fri 06 Jan 2023 01:11:43 PM UTC] Domains not changed.
[Fri 06 Jan 2023 01:11:43 PM UTC] Skip, Next renewal time is: 2023-03-06T12:51:12Z
[Fri 06 Jan 2023 01:11:43 PM UTC] Add ‘–force’ to force to renew.
[Fri 06 Jan 2023 01:11:43 PM UTC] Installing key to: /etc/v2ray/fekune.top.key
[Fri 06 Jan 2023 01:11:43 PM UTC] Installing full chain to: /etc/v2ray/fekune.top.pem
[Fri 06 Jan 2023 01:11:43 PM UTC] Run reload cmd: service nginx force-reload
nginx.service is not active, cannot reload.
[Fri 06 Jan 2023 01:11:43 PM UTC] Reload error for :
安装V2ray…
/dev/fd/63: line 201: /usr/bin/v2ray/v2ray: No such file or directory
安装V2Ray v5.1.0 ,架构64
v2ray没安装上,卸载重装
卸载重装了好多次了,都是一样的反馈
我把安装日志贴出来
Hit:1 http://deb.debian.org/debian buster InRelease
Hit:2 http://deb.debian.org/debian buster-updates InRelease
Hit:3 http://security.debian.org buster/updates InRelease
Hit:4 http://deb.debian.org/debian buster-backports InRelease
Reading package lists… Done
Building dependency tree
Reading state information… Done
All packages are up to date.
Reading package lists… Done
Building dependency tree
Reading state information… Done
gcc is already the newest version (4:8.3.0-1).
openssl is already the newest version (1.1.1n-0+deb10u3).
tar is already the newest version (1.30+dfsg-6).
wget is already the newest version (1.20.1-1.1).
unzip is already the newest version (6.0-23+deb10u3).
vim is already the newest version (2:8.1.0875-5+deb10u4).
The following packages were automatically installed and are no longer required:
fontconfig-config fonts-dejavu-core geoip-database libfontconfig1 libgd3 libgeoip1
libjbig0 libjpeg62-turbo libtiff5 libwebp6 libx11-6 libx11-data libxau6 libxcb1 libxdmcp6
libxpm4
Use ‘apt autoremove’ to remove them.
0 upgraded, 0 newly installed, 0 to remove and 0 not upgraded.
Reading package lists… Done
Building dependency tree
Reading state information… Done
net-tools is already the newest version (1.60+git20180626.aebd88e-1).
The following packages were automatically installed and are no longer required:
fontconfig-config fonts-dejavu-core geoip-database libfontconfig1 libgd3 libgeoip1
libjbig0 libjpeg62-turbo libtiff5 libwebp6 libx11-6 libx11-data libxau6 libxcb1 libxdmcp6
libxpm4
Use ‘apt autoremove’ to remove them.
0 upgraded, 0 newly installed, 0 to remove and 0 not upgraded.
Reading package lists… Done
Building dependency tree
Reading state information… Done
g++ is already the newest version (4:8.3.0-1).
libssl-dev is already the newest version (1.1.1n-0+deb10u3).
The following packages were automatically installed and are no longer required:
fontconfig-config fonts-dejavu-core geoip-database libfontconfig1 libgd3 libgeoip1
libjbig0 libjpeg62-turbo libtiff5 libwebp6 libx11-6 libx11-data libxau6 libxcb1 libxdmcp6
libxpm4
Use ‘apt autoremove’ to remove them.
0 upgraded, 0 newly installed, 0 to remove and 0 not upgraded.
安装nginx…
Reading package lists… Done
Building dependency tree
Reading state information… Done
The following additional packages will be installed:
libnginx-mod-http-auth-pam libnginx-mod-http-dav-ext libnginx-mod-http-echo
libnginx-mod-http-geoip libnginx-mod-http-image-filter libnginx-mod-http-subs-filter
libnginx-mod-http-upstream-fair libnginx-mod-http-xslt-filter libnginx-mod-mail
libnginx-mod-stream nginx-common nginx-full
Suggested packages:
fcgiwrap nginx-doc ssl-cert
The following NEW packages will be installed:
libnginx-mod-http-auth-pam libnginx-mod-http-dav-ext libnginx-mod-http-echo
libnginx-mod-http-geoip libnginx-mod-http-image-filter libnginx-mod-http-subs-filter
libnginx-mod-http-upstream-fair libnginx-mod-http-xslt-filter libnginx-mod-mail
libnginx-mod-stream nginx nginx-common nginx-full
0 upgraded, 13 newly installed, 0 to remove and 0 not upgraded.
Selecting previously unselected package libnginx-mod-http-xslt-filter.
Preparing to unpack …/08-libnginx-mod-http-xslt-filter_1.14.2-2+deb10u5_amd64.deb …
Unpacking libnginx-mod-http-xslt-filter (1.14.2-2+deb10u5) …
Selecting previously unselected package libnginx-mod-mail.
Preparing to unpack …/09-libnginx-mod-mail_1.14.2-2+deb10u5_amd64.deb …
Unpacking libnginx-mod-mail (1.14.2-2+deb10u5) …
Selecting previously unselected package libnginx-mod-stream.
Preparing to unpack …/10-libnginx-mod-stream_1.14.2-2+deb10u5_amd64.deb …
Unpacking libnginx-mod-stream (1.14.2-2+deb10u5) …
Selecting previously unselected package nginx-full.
Preparing to unpack …/11-nginx-full_1.14.2-2+deb10u5_amd64.deb …
Unpacking nginx-full (1.14.2-2+deb10u5) …
Selecting previously unselected package nginx.
Preparing to unpack …/12-nginx_1.14.2-2+deb10u5_all.deb …
Unpacking nginx (1.14.2-2+deb10u5) …
Setting up nginx-common (1.14.2-2+deb10u5) …
Setting up libnginx-mod-http-xslt-filter (1.14.2-2+deb10u5) …
Setting up libnginx-mod-http-auth-pam (1.14.2-2+deb10u5) …
Setting up libnginx-mod-http-geoip (1.14.2-2+deb10u5) …
Setting up libnginx-mod-http-echo (1.14.2-2+deb10u5) …
Setting up libnginx-mod-http-subs-filter (1.14.2-2+deb10u5) …
Setting up libnginx-mod-http-dav-ext (1.14.2-2+deb10u5) …
Setting up libnginx-mod-mail (1.14.2-2+deb10u5) …
Setting up libnginx-mod-http-image-filter (1.14.2-2+deb10u5) …
Setting up libnginx-mod-stream (1.14.2-2+deb10u5) …
Setting up libnginx-mod-http-upstream-fair (1.14.2-2+deb10u5) …
Setting up nginx-full (1.14.2-2+deb10u5) …
Setting up nginx (1.14.2-2+deb10u5) …
Processing triggers for systemd (241-7~deb10u8) …
Synchronizing state of nginx.service with SysV service script with /lib/systemd/systemd-sysv-install.
Executing: /lib/systemd/systemd-sysv-install enable nginx
Created symlink /etc/systemd/system/multi-user.target.wants/nginx.service → /lib/systemd/system/nginx.service.
Reading package lists… Done
Building dependency tree
Reading state information… Done
openssl is already the newest version (1.1.1n-0+deb10u3).
socat is already the newest version (1.7.3.2-2).
0 upgraded, 0 newly installed, 0 to remove and 0 not upgraded.
Reading package lists… Done
Building dependency tree
Reading state information… Done
cron is already the newest version (3.0pl1-134+deb10u1).
0 upgraded, 0 newly installed, 0 to remove and 0 not upgraded.
Synchronizing state of cron.service with SysV service script with /lib/systemd/systemd-sysv-install.
Executing: /lib/systemd/systemd-sysv-install enable cron
% Total % Received % Xferd Average Speed Time Time Time Current
Dload Upload Total Spent Left Speed
100 214k 100 214k 0 0 7657k 0 –:–:– –:–:– –:–:– 7657k
[Fri 06 Jan 2023 01:56:19 PM UTC] Installing from online archive.
[Fri 06 Jan 2023 01:56:19 PM UTC] Downloading https://github.com/acmesh-official/acme.sh/archive/master.tar.gz
[Fri 06 Jan 2023 01:56:21 PM UTC] Extracting master.tar.gz
[Fri 06 Jan 2023 01:56:21 PM UTC] Installing to /root/.acme.sh
[Fri 06 Jan 2023 01:56:21 PM UTC] Installed to /root/.acme.sh/acme.sh
[Fri 06 Jan 2023 01:56:21 PM UTC] Installing alias to ‘/root/.bashrc’
[Fri 06 Jan 2023 01:56:21 PM UTC] OK, Close and reopen your terminal to start using acme.sh
[Fri 06 Jan 2023 01:56:21 PM UTC] Installing cron job
[Fri 06 Jan 2023 01:56:21 PM UTC] Good, bash is found, so change the shebang to use bash as preferred.
[Fri 06 Jan 2023 01:56:23 PM UTC] OK
[Fri 06 Jan 2023 01:56:23 PM UTC] Install success!
[Fri 06 Jan 2023 01:56:23 PM UTC] Already uptodate!
[Fri 06 Jan 2023 01:56:23 PM UTC] Upgrade success!
[Fri 06 Jan 2023 01:56:23 PM UTC] Changed default CA to: https://acme-v02.api.letsencrypt.org/directory
[Fri 06 Jan 2023 01:56:24 PM UTC] Domains not changed.
[Fri 06 Jan 2023 01:56:24 PM UTC] Skip, Next renewal time is: 2023-03-06T12:51:12Z
[Fri 06 Jan 2023 01:56:24 PM UTC] Add ‘–force’ to force to renew.
[Fri 06 Jan 2023 01:56:24 PM UTC] Installing key to: /etc/v2ray/fekune.top.key
[Fri 06 Jan 2023 01:56:24 PM UTC] Installing full chain to: /etc/v2ray/fekune.top.pem
[Fri 06 Jan 2023 01:56:24 PM UTC] Run reload cmd: service nginx force-reload
nginx.service is not active, cannot reload.
[Fri 06 Jan 2023 01:56:24 PM UTC] Reload error for :
安装V2ray…
/dev/fd/63: line 201: /usr/bin/v2ray/v2ray: No such file or directory
安装V2Ray v5.1.0 ,架构64
下载V2Ray: https://github.com/v2fly/v2ray-core/releases/download/v5.1.0/v2ray-linux-64.zip
% Total % Received % Xferd Average Speed Time Time Time Current
Dload Upload Total Spent Left Speed
0 0 0 0 0 0 0 0 –:–:– –:–:– –:–:– 0
100 10.5M 100 10.5M 0 0 11.1M 0 –:–:– –:–:– –:–:– 87.6M
Archive: /tmp/v2ray/v2ray.zip
inflating: /tmp/v2ray/geosite.dat
inflating: /tmp/v2ray/geoip.dat
inflating: /tmp/v2ray/vpoint_vmess_freedom.json
inflating: /tmp/v2ray/vpoint_socks_vmess.json
inflating: /tmp/v2ray/config.json
creating: /tmp/v2ray/systemd/
creating: /tmp/v2ray/systemd/system/
inflating: /tmp/v2ray/systemd/system/v2ray.service
inflating: /tmp/v2ray/systemd/system/v2ray@.service
inflating: /tmp/v2ray/v2ray
inflating: /tmp/v2ray/geoip-only-cn-private.dat
Created symlink /etc/systemd/system/multi-user.target.wants/v2ray.service → /etc/systemd/system/v2ray.service.
BBR模块已安装
v2ray启动失败,请检查日志或查看端口是否被占用!
V2ray运行状态:已安装 未运行
请问解决了吗 我这也是这个问题
我也有冷个问我,2个都是
想知道这个和带伪装脚本有什么区别。这个伪装要怎么验证,我每次都是配置好伪装域名,但是实际还是IP连接的。谢谢。
选带tls就是伪装的,这个脚本已经包含伪装版本的了
[Warning] [1255552681] proxy/http: failed to read response from ipv6.msftconnecttest.com > io: read/write on closed pipe
请问这个代表啥意思呢?之前是端口被封,这次换端口也不管用了
配置错了,或者服务器防火墙没放行端口
请问我用的VMESS+WS+TLS,但是端口一直被封怎么办呢,443被封之后换了好几个端口了,都是一星期左右就再次被封,请问有什么好的解决办法吗?
刚开始弄好不要用太多流量
由于端口被封频率较高,有没有简单的端口修改方法?重新运行一次脚本略显麻烦
/etc/v2ray/config.json 进这个文件 改端口 然后重启服务 或服务器 即可
大佬,测试服务器延迟显示timeout,测试服务器速度显示已取消一个任务,但我挂上买的梯子重新测试就有延迟和速度了。该怎么解决。。小白求教
节点挂了
大家好,一键脚本已升级,本次升级内容为TLS。优先使用TLS1.3,已剔除对TLS1.1版本支持。排除安全隐患,提高nginx性能。经测试,速度变化明显。建议将客户端(v2rayN、Clash、Shadowrocket等)软件也升级为最新版本。
ps:
1、最近经常收到小伙伴反馈端口频繁被封,由于GFW是黑盒,无法准确定位原因,不能确定是否和以前支持的TLS1.1版本有关。有关TLS1.1漏洞,感兴趣的小伙伴可以在google上自行搜索。
http://blog.nsfocus.net/wp-content/uploads/2018/10/59c34a179340c0a9f72e7f3ac6ff3f3d.png
2、nginx使用TLS1.3后安全性更高,速度更快。相关原理参考下图:
https://pic1.zhimg.com/80/v2-fe2f38e816c45858c553b228f1f5a01c_1440w.webp
3、使用TLS1.3需要服务器端和客户端同时支持,因此建议将客户端(v2rayN、Clash、Shadowrocket等)软件也升级为最新版本。
4、如何查询正在使用的是tls那个版本。
使用https://www.ssllabs.com/ssltest/analyze.html,不出意外,你应该看到绿色的A级,显示This server supports TLS 1.3.
或使用https://blog.csdn.net/qq_37948745/article/details/108418838
哪里升级了阿
2022年12月10日之后用该脚本安装的不受影响,12月10日之前安装的,建议重新安装。
我这个是vps被墙了么
[Warning] [2782749775] app/proxyman/outbound: failed to process outbound traffic > proxy/vmess/outbound: failed to find an available destination > common/retry: [transport/internet/websocket: failed to dial WebSocket > transport/internet/websocket: failed to dial to (wss://slcz1992.xyz:10443/zWUtI75): > dial tcp: i/o timeout transport/internet/websocket: failed to dial WebSocket > transport/internet/websocket: failed to dial to (wss://slcz1992.xyz:10443/zWUtI75): > dial tcp: operation was canceled transport/internet/websocket: failed to dial WebSocket > transport/internet/websocket: failed to dial to (wss://slcz1992.xyz:10443/zWUtI75): > dial tcp: lookup slcz1992.xyz: operation was canceled] > common/retry: all retry attempts failed
你好 之前一直有用 最近半年没用 现在打开就用不了了
2022/12/08 11:12:39 127.0.0.1:4600 accepted //client.wns.windows.com:443 [proxy]
2022/12/08 11:12:41 [Warning] [76985833] app/proxyman/outbound: failed to process outbound traffic > proxy/trojan: failed to find an available destination > common/retry: [dial tcp 185.149.22.74:1205: i/o timeout dial tcp 185.149.22.74:1205: operation was canceled dial tcp: lookup http://www.youhou8.gq: operation was canceled] > common/retry: all retry attempts failed
2022/12/08 11:12:41 [Warning] [1645720039] app/proxyman/outbound: failed to process outbound traffic > proxy/trojan: failed to find an available destination > common/retry: [dial tcp 185.149.22.74:1205: i/o timeout dial tcp 185.149.22.74:1205: operation was canceled dial tcp: lookup http://www.youhou8.gq: operation was canceled] > common/retry: all retry attempts failed
2022/12/08 11:12:44 [Warning] [467171161] app/proxyman/outbound: failed to process outbound traffic > proxy/trojan: failed to find an available destination > common/retry: [dial tcp 185.149.22.74:1205: operation was canceled dial tcp: lookup http://www.youhou8.gq: operation was canceled] > common/retry: all retry attempts failed
2022/12/08 11:12:46 127.0.0.1:4607 accepted //geover.prod.do.dsp.mp.microsoft.com:443 [proxy]
谢谢!
最近半个月总是隔三差五的无法访问外网,但是ping IP没问题,每次都是重新搭建一次就好了,用的VMESS+WS+TLS,报错信息如下:
2022/12/06 19:34:51 [Warning] [1143681603] app/proxyman/outbound: failed to process outbound traffic > proxy/vmess/outbound: failed to find an available destination > common/retry: [transport/internet/websocket: failed to dial WebSocket > transport/internet/websocket: failed to dial to (wss://78.141.246.240:8860/OGjyLccrSKw): > dial tcp 78.141.246.240:8860: i/o timeout transport/internet/websocket: failed to dial WebSocket > transport/internet/websocket: failed to dial to (wss://78.141.246.240:8860/OGjyLccrSKw): > dial tcp 78.141.246.240:8860: operation was canceled] > common/retry: all retry attempts failed
2022/12/06 19:34:54 [Warning] [3040005799] app/dispatcher: default route for tcp:functional.events.data.microsoft.com:443
大佬能给看看这是啥意思吗?只会按照教程自己搭一个,网络方面我是一窍不通的小白
端口被封了,换个端口,建议用443
202211月最近封地厉害,不懂网络,个人经历,仅供参考。
1) 用的“7. 安装V2ray-VLESS+WS+TLS(可过cdn)” 方式安装的v2ray。 2) 安装v2ray时,关掉cloudflare伪装域名旁的小黄云,否则会提示伪装域名无法解析到服务器ip。 3)安装完后在手机和ubuntu下测试可以正常打开谷歌。
4)打开cloudflare伪装域名旁的小黄云,等大概3,5分钟,ping 伪装域名显示的不是服务器ip。 同时手机和linux依然可以正常访问谷歌。 注意: 安装v2ray时,端口我没有选择443,伪装站类型没有选择静态类型,允许爬虫(想着让墙看起来更正常一点)
是的,通过前置cdn将你vps真实的ip及port隐藏起来,这种方法很多人在使用。感觉cloudflare和google一样,全面退出已经不远了。
443端口, 原来的端口没用几天(只是谷歌查了下资料,都没看视频)也被封了。请问群主:运行一键脚本先卸载,再继续选择别的端口安装吗?有没有什么端口不那么容易被封?
是的,先运行一键脚本卸载,再继续选择别的端口。没有不容易封的端口,你的做法是正确的,套CDN解决。
我的VPS突然不能访问外部网页,VPS可以ping通
> v2ray.com/core/proxy/vmess/outbound: failed to find an available destination
> v2ray.com/core/common/retry: [v2ray.com/core/transport/internet/websocket: failed to dial WebSocket
> v2ray.com/core/transport/internet/websocket: failed to dial to (wss://64.64.227.11/abcdef):
> dial tcp 64.64.227.11:443: i/o timeout v2ray.com/core/transport/internet/websocket: failed to dial WebSocket
> v2ray.com/core/transport/internet/websocket: failed to dial to (wss://64.64.227.11/abcdef):
> dial tcp 64.64.227.11:443: operation was canceled]
> v2ray.com/core/common/retry: all retry attempts failed
我用的vps中文全部显示乱码 修复了也不行
我系统是c7.9,为什么运行脚本显示不支持啊
建议用debian10
[WARNING] [TCP] dial PROXY (match DomainKeyword/google) 127.0.0.1:53988 –> http://www.google.com:443 error: server:443 connect error: lookup server: no such host 每次在chrome发起检索,在clash客户端的日志上就会显示这个,这是哪出现问题了。
dns相关配置错了
那得咋解决dns配置啊,谢谢,有持续的联系方式吗,想赶在30天之内解决,要不就退不了vps了,谢谢
建议试试其他客户端