Xray项目已经确定独自运作,目前最新版是1.1.2版本。根据测试数据,服务端direct+客户端使用splice后性能比VLESS裸奔还要强上一倍,已经远超trojan/trojan-go,非常推荐使用。
本文的Xray一键脚本可以配置常规VMESS协议、VMESS+KCP、VMESS+websocket+TLS+Nginx、VLESS+TCP+XTLS、VLESS+TCP+TLS、trojan、trojan+XTLS等多种组合,支持CentOS 7/8、Ubuntu 16.04、Debian 8及新版系统。
注意:目前CentOS7系统已经到生命周期,不建议使用该系统,可能会导致脚本运行失败!建议使用Debian或者Ubuntu系统。
Xray一键脚本使用方法
Xray一键脚本使用步骤如下:
1. 准备一个境外服务器,想服务器速度快请参考 搬瓦工VPS购买教程 或从 CN2 GIA VPS商家推荐 选购,想ip被封后免费换请参考:购买vultr服务器超详细图文教程。
如果用VMESS+WS+TLS或者VLESS系列协议,则还需一个域名。对域名没有要求,国内/国外注册的都可以,不需要备案,不会影响使用,也不会带来安全/隐私上的问题。购买域名可参考:Namesilo购买域名详细教程。
值得一提的是本Xray一键脚本支持ipv6 only服务器,但是不建议用只有ipv6的VPS用来科学上网。
2. 如果vps运营商开启了防火墙(阿里云、Ucloud、腾讯云、AWS、GCP等商家默认有,搬瓦工/hostdare/vultr等商家默认关闭),请先登录vps管理后台放行80和443端口,否则可能会导致获取证书失败。此外,本脚本支持上传自定义证书,可跳过申请证书这一步,也可用在NAT VPS上。
3. ssh连接到服务器。Windows系统请参考 Bitvise连接Linux服务器教程,mac用户请参考 Mac电脑连接Linux教程。
4. 复制(或手动输入)下面命令到终端:
bash <(curl -Ls https://raw.githubusercontent.com/daveleung/hijkpw-scripts-mod/main/xray_mod1.sh)按回车键,将出现如下操作菜单。如果菜单没出现,CentOS系统请输入 yum install -y curl,Ubuntu/Debian系统请输入 apt install -y curl,然后再次运行上面的命令:
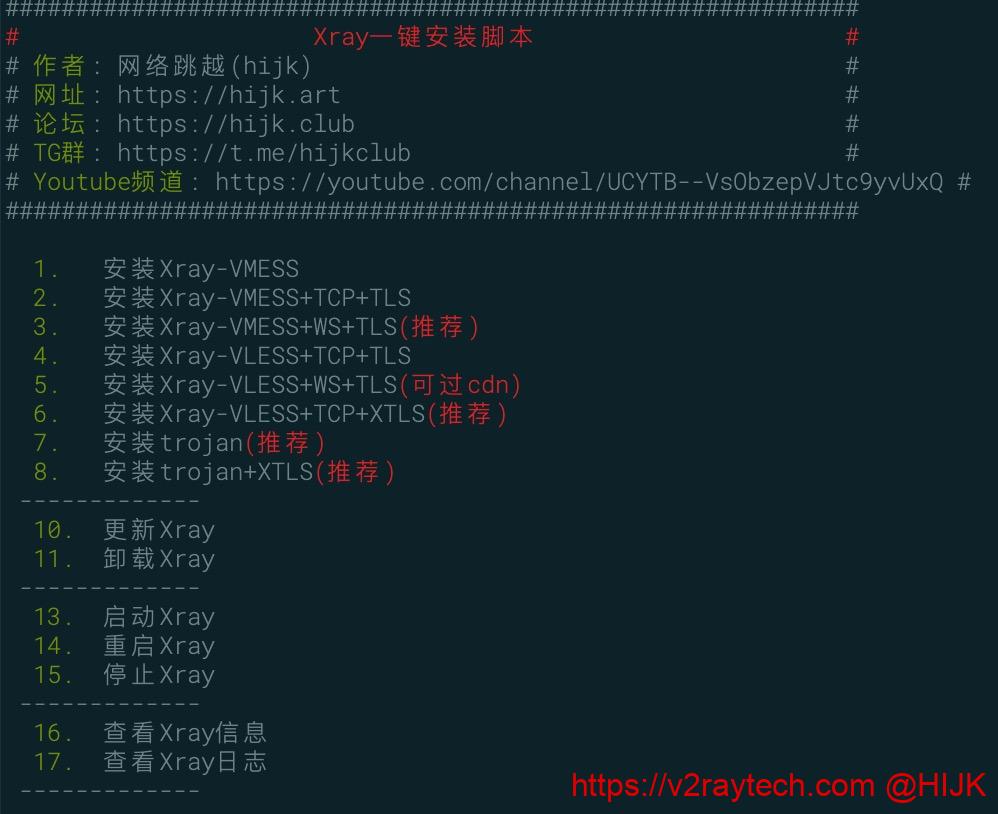
Xray一键安装脚本
本Xray一键脚本目前支持以下组合方式:
- VMESS,即最普通的V2ray服务器,没有伪装,也不是VLESS
- VMESS+KCP,传输协议使用mKCP,VPS线路不好时可能有奇效
- VMESS+TCP+TLS,带伪装的V2ray,不能过CDN中转
- VMESS+WS+TLS,即最通用的V2ray伪装方式,能过CDN中转,推荐使用
- VLESS+KCP,传输协议使用mKCP
- VLESS+TCP+TLS,通用的VLESS版本,不能过CDN中转,但比VMESS+TCP+TLS方式性能更好
- VLESS+WS+TLS,基于websocket的V2ray伪装VLESS版本,能过CDN中转,有过CDN情况下推荐使用
- VLESS+TCP+XTLS,目前最强悍的VLESS+XTLS组合,强力推荐使用(但是支持的客户端少一些)
- trojan,轻量级的伪装协议
- trojan+XTLS,trojan加强版,使用XTLS技术提升性能
注意:目前一些客户端不支持VLESS协议,或者不支持XTLS,请按照自己的情况选择组合
5. 按照自己的需求选择一个方式。例如6,然后回车。接着脚本会让你输入一些信息,也可以直接按回车使用默认值。需要注意的是,对于要输入伪装域名的情况,如果服务器上有网站在运行,请联系运维再执行脚本,否则可能导致原来网站无法访问!
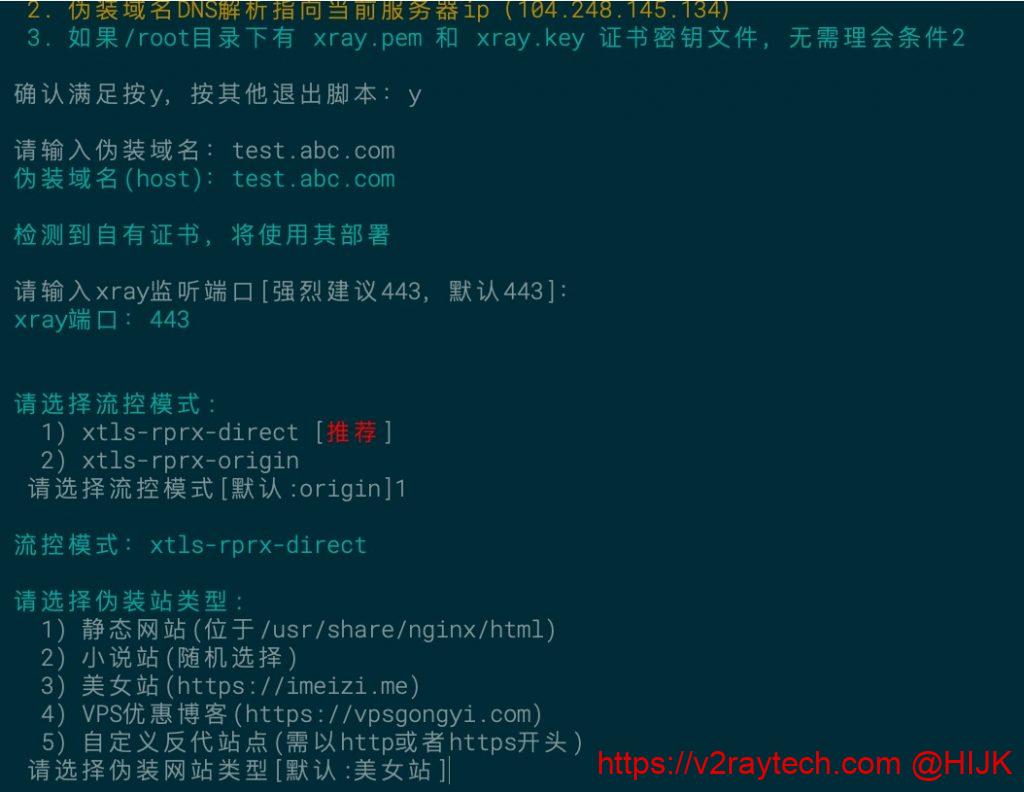
xray一键脚本输入
6. 脚本接下来会自动运行,一切顺利的话结束后会输出配置信息:
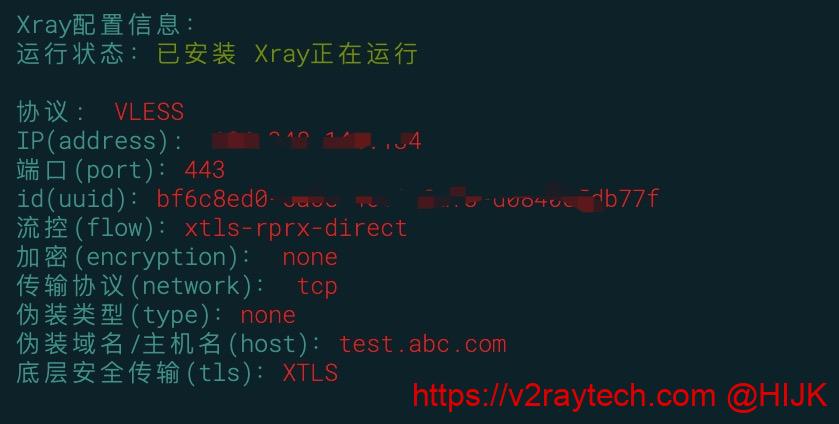
Xray一键脚本运行成功输出信息
到此服务端配置完毕,服务器可能会自动重启(没提示重启则不需要),windows终端出现“disconnected”,mac出现“closed by remote host”说明服务器成功重启了。
对于VLESS协议、VMESS+WS+TLS的组合,网页上输入伪装域名,能正常打开伪装站,说明服务端已经正确配置好。如果运行过程中出现问题,请在本页面下方查找解决方法或留言。
Xray一键脚本其他事项
服务端配置好后,如果想使用CloudFlare等CDN中转(必须是WS版才可以),请参考:使用cloudflare中转流量,拯救被墙ip。
本脚本默认使用的加速技术是BBR,换成魔改BBR/BBR Plus/锐速清参考:安装魔改BBR/BBR Plus/锐速(Lotserver)。
如果伪装站类型没有你满意的,比如你想搭建WordPress博客,请参考:V2ray伪装建站教程。
对于使用TLS的方式,脚本默认会申请域名证书,证书存放在和xray配置文件同一个文件夹内(即/usr/local/etc/xray目录下)。证书会自动更新,如果客户端突然无法使用,请打开伪装网站查看是否能正常打开。如果证书已过期,请再次运行上面的脚本重新配置。
最后,刚搭建好Xray后不要猛上流量,否则会导致被限速、端口被墙,严重可能导致ip被墙。
接下来是配置客户端,下载客户端和配置教程请参考:
祝大家使用愉快。如有问题请在页面下方留言。
什么时候更下 ss2022 加入到这个脚本里呢? 还有 能不能添加多协议同时创建的功能 比如vless + trojan 一起
麻烦更新下脚本能让脚本获取最新的xray版本,脚本只能获取到1.55,实际已经1.58了,谢谢大神
您好,最近忽然连不上了,我想重新看看xray运行状况,ssh链接服务器后输入:
bash <(curl -sL https://cdn.jsdelivr.net/gh/Misaka-blog/Xray-script@master/xray.sh)
提示:
/dev/fd/63: line 1: Failed: command not found
我在评论区找到了方法但我很好奇这是什么缘故?
原脚本失效了
作者你。我用这个脚本搭建【9.trojan】,界面能显示搭建成功,但是我怎么连都连不上。我用的oracle的Ubuntu。而且我发现xray已经到了最新的1.5.8了,脚本里的更新选项还总是下载1.4.x或者1.5.5。
bash <(curl -sL https://raw.githubusercontent.com/daveleung/hijkpw-scripts-mod/main/xray_mod1.sh)
博主你好,我之前用得好好的,6月还正常更新过一次,上周重装电脑后打开bitvise能连接上服务器,但是输入第四步的命令后显示
/dev/fd/63: line 1:Failed: command not found
用这个:bash<(curl -sL https://raw.githubusercontent.com/daveleung/hijkpw-scripts-mod/main/xray_mod1.sh)
用这个后显示
-bash: bash/dev/fd/63: No such file or directory
bash <(curl -sL https://cdn.jsdelivr.net/gh/Misaka-blog/Xray-script@master/xray.sh)中的
https://cdn.jsdelivr.net/gh/Misaka-blog/Xray-script@master/xray.sh失效了,请问我现在想看服务器上xray生成的订阅信息该用什么命令?
用这个:bash<(curl -sL https://raw.githubusercontent.com/daveleung/hijkpw-scripts-mod/main/v2ray_mod1.sh)
你好,用了新的命令显示找不到文件
-bash: bash/dev/fd/63: No such file or directory
用这个命令:bash <(curl -sL https://raw.githubusercontent.com/daveleung/hijkpw-scripts-mod/main/xray_mod1.sh)
行了,谢谢,有简短指令吗?
请问之前设置过的有没有什么快捷指令可以直接打开修改信息?
这个也不行啊,404了
复制整个命令
[Fri Jun 10 20:04:15 PST 2022] Installing from online archive.
[Fri Jun 10 20:04:15 PST 2022] Downloading https://github.com/acmesh-official/ acme.sh/archive/master.tar.gz
[Fri Jun 10 20:04:16 PST 2022] Extracting master.tar.gz
[Fri Jun 10 20:04:16 PST 2022] Installing to /root/.acme.sh
[Fri Jun 10 20:04:16 PST 2022] Installed to /root/.acme.sh/acme.sh
[Fri Jun 10 20:04:16 PST 2022] Installing alias to ‘/root/.bashrc’
[Fri Jun 10 20:04:16 PST 2022] OK, Close and reopen your terminal to start usi ng acme.sh
[Fri Jun 10 20:04:16 PST 2022] Installing alias to ‘/root/.cshrc’
[Fri Jun 10 20:04:16 PST 2022] Installing alias to ‘/root/.tcshrc’
[Fri Jun 10 20:04:16 PST 2022] Installing cron job
29 0 * * * “/root/.acme.sh”/acme.sh –cron –home “/root/.acme.sh” > /dev/null
[Fri Jun 10 20:04:16 PST 2022] Good, bash is found, so change the shebang to u se bash as preferred.
[Fri Jun 10 20:04:16 PST 2022] OK
[Fri Jun 10 20:04:16 PST 2022] Install success!
[Fri Jun 10 20:04:17 PST 2022] Already uptodate!
[Fri Jun 10 20:04:17 PST 2022] Upgrade success!
[Fri Jun 10 20:04:17 PST 2022] Changed default CA to: https://acme-v02.api.let sencrypt.org/directory
[Fri Jun 10 20:04:19 PST 2022] Using CA: https://acme-v02.api.letsencrypt.org/ directory
[Fri Jun 10 20:04:19 PST 2022] Run pre hook:’systemctl stop nginx’
/root/.acme.sh/acme.sh: line 3411: systemctl: command not found
[Fri Jun 10 20:04:19 PST 2022] Error when run pre hook.
[Fri Jun 10 20:04:19 PST 2022] _on_before_issue.
抱歉,证书申请失败
建议如下:
1. 自行检测防火墙是否打开,如防火墙正在开启,请关闭防火墙或放行80端口
2. 同一域名多次申请触发Acme.sh官方风控,请更换域名或等待7天后再尝试执行脚本
3. 脚本可能跟不上时代,建议截图发布到GitHub Issues或TG群询问
你不能下载3以上的版本,我也是研究了很久,你需要下载2.9的版本即可
怎么现在脚本里xtls变成不推荐了=w=
大佬,域名的解析结果显示的是我服务器的IP,是IPv4的。但是提示域名未解析到当前服务器IP,这个当前服务器IP显示的是IPv6的IP地址,这是什么问题啊,是还没解析好吗?
是用Namesilo网站解析的。
需要用ipv4地址
同出现这个问题,请问如何操作让VPS使用IPV4的IP呀?
如果vps有ipv4地址,默认就会解析到ipv4
使用bash <(curl -sL https://cdn.jsdelivr.net/gh/Misaka-blog/Xray-script@master/xray.sh)。安装,为什么Xray-VLESS+TCP+XTLS是不推荐的,那现在推荐使用那种呢?
vmess+ws+tls
请选择操作[0-23]:11
检测 Xray 版本失败,可能是VPS网络错误,请检查后重试
有台vps报错无法升级,但是另外一台就可以。
都重新安装一下
网络状态肯定是正常的,nginx,bbr都可以正常安装,最后显示检测 Xray 版本失败,请检查网络,是不是xray源出现了问题?
有可能,多试一下
大佬您好,我配置成功以后总是掉线,可以连上但速度也特别慢,买的阿里云的境外vps,这是服务器端的xray日志,可以看一下是哪里出了问题吗?万分感激
4月 01 09:16:05 iZt4nbobyt8kiab4rwmx4rZ xray[64039]: 2022/04/01 09:16:05 [Warning] [2098388991] app/proxyman/inbound: connection ends > proxy/vless/inbound: failed to find the default “alpn” config
4月 01 09:20:54 iZt4nbobyt8kiab4rwmx4rZ xray[64039]: 2022/04/01 09:20:54 [Warning] [334870186] app/proxyman/inbound: connection ends > proxy/vless/inbound: failed to find the default “alpn” config
4月 01 09:31:25 iZt4nbobyt8kiab4rwmx4rZ xray[64039]: 2022/04/01 09:31:25 [Warning] [3636802893] app/proxyman/inbound: connection ends > proxy/vless/inbound: failed to find the default “alpn” config
4月 01 09:44:46 iZt4nbobyt8kiab4rwmx4rZ systemd[1]: Stopping Xray Service…
— Subject: xray.service 单元已开始停止操作
— Defined-By: systemd
— Support: https://access.redhat.com/support
—
— xray.service 单元已开始停止操作。
4月 01 09:44:46 iZt4nbobyt8kiab4rwmx4rZ systemd[1]: Stopped Xray Service.
— Subject: xray.service 单元已结束停止操作
— Defined-By: systemd
— Support: https://access.redhat.com/support
—
— xray.service 单元已结束停止操作。
— Reboot —
4月 01 09:45:14 iZt4nbobyt8kiab4rwmx4rZ systemd[1]: Started Xray Service.
— Subject: xray.service 单元已结束启动
— Defined-By: systemd
— Support: https://access.redhat.com/support
—
— xray.service 单元已结束启动。
—
— 启动结果为“done”。
4月 01 09:45:15 iZt4nbobyt8kiab4rwmx4rZ xray[907]: Xray 1.5.3 (Xray, Penetrates Everything.) Custom (go1.17.6 linux/amd64)
4月 01 09:45:15 iZt4nbobyt8kiab4rwmx4rZ xray[907]: A unified platform for anti-censorship.
4月 01 09:45:15 iZt4nbobyt8kiab4rwmx4rZ xray[907]: 2022/04/01 09:45:15 [Info] infra/conf/serial: Reading config: /usr/local/etc/xray/config.json
4月 01 09:45:15 iZt4nbobyt8kiab4rwmx4rZ xray[907]: 2022/04/01 09:45:15 [Warning] core: Xray 1.5.3 started
那个时间点我重启了一下服务器,然后ssh连上看了一下日志
然后我运行域名健康检测,结果如下
HTTP 状态码:端口无法连通,请检查服务器设置
80 端口检查:端口无法连通,请检查服务器设置
443 端口检查:端口可连通,未检测到有效服务
请问下正常吗?
不好意思,刚刚更换了一个弹性公网IP,然后排查了下发现Nginx服务没有启动,启动了Nginx服务以后一切正常了,感谢大佬的教程
大佬,现在是vless+ws+tls好些,还是vless+tcp+xtls好些啊?
都可以
博主,你好!
我在服务器端使用的 VLESS+TCP+XTLS
config 如下:
{
“log”: {
“access”: “/var/log/xray/access.log”,
“error”: “/var/log/xray/error.log”,
“loglevel”: “debug”
},
“inbounds”: [{
“port”: 443,
“protocol”: “vless”,
“settings”: {
“clients”: [
{
“id”: “xxxxxxxxxx”,
“flow”: “xtls-rprx-direct”,
“level”: 0
}
],
“decryption”: “none”,
“fallbacks”: [
{
“alpn”: “http/1.1”,
“dest”: 80
},
{
“alpn”: “h2”,
“dest”: 81
}
]
},
“streamSettings”: {
“network”: “tcp”,
“security”: “xtls”,
“xtlsSettings”: {
“serverName”: “weather.xxx.com”,
“alpn”: [“http/1.1”, “h2”],
“certificates”: [
{
“certificateFile”: “/usr/local/etc/xray/weather.xxx.com.pem”,
“keyFile”: “/usr/local/etc/xray/weather.xxx.com.key”
}
]
}
}
}],
“outbounds”: [{
“protocol”: “freedom”,
“settings”: {}
},{
“protocol”: “blackhole”,
“settings”: {},
“tag”: “blocked”
}]
}
错误的日志:
2022/03/27 17:09:32 [Info] [3980656306] proxy/vless/inbound: firstLen = 0
2022/03/27 17:09:32 [Info] [3980656306] proxy/vless/inbound: fallback starts > proxy/vless/inbound: fallback directly
2022/03/27 17:09:32 [Info] [3980656306] proxy/vless/inbound: realName = weather.xxx.com
2022/03/27 17:09:32 [Info] [3980656306] proxy/vless/inbound: realAlpn = http/1.1
2022/03/27 17:09:32 [Info] [3980656306] app/proxyman/inbound: connection ends > proxy/vless/inbound: fallback ends > proxy/vless/inbound: failed to fallback request payload > read tcp x.x.x.x:443->x.x.x.x:2323: read: connection reset by peer
客户端使用的是 v2rayN 4.36
在浏览器中没开代理直接打开 http://weather.xxx.com 是ok的,但是打开 https://weather.xxx.com 出错,在开代理的情况下,网站都打不开
config:
{
“log”: {
“access”: “C:\\Users\\user\\Downloads\\v2rayN-Core\\Vaccess.log”,
“error”: “C:\\Users\\user\\Downloads\\v2rayN-Core\\Verror.log”,
“loglevel”: “debug”
},
“inbounds”: [
{
“tag”: “socks”,
“port”: 10808,
“listen”: “127.0.0.1”,
“protocol”: “socks”,
“sniffing”: {
“enabled”: true,
“destOverride”: [
“http”,
“tls”
]
},
“settings”: {
“auth”: “noauth”,
“udp”: true,
“allowTransparent”: false
}
},
{
“tag”: “http”,
“port”: 10809,
“listen”: “127.0.0.1”,
“protocol”: “http”,
“sniffing”: {
“enabled”: true,
“destOverride”: [
“http”,
“tls”
]
},
“settings”: {
“udp”: false,
“allowTransparent”: false
}
}
],
“outbounds”: [
{
“tag”: “proxy”,
“protocol”: “vless”,
“settings”: {
“vnext”: [
{
“address”: “x.x.x.x”,
“port”: 443,
“users”: [
{
“id”: “xxxxxxxxxx”,
“alterId”: 0,
“email”: “t@t.tt”,
“security”: “auto”,
“encryption”: “none”,
“flow”: “xtls-rprx-direct”
}
]
}
]
},
“streamSettings”: {
“network”: “tcp”,
“security”: “xtls”,
“xtlsSettings”: {
“allowInsecure”: false,
“serverName”: “weather.xxx.com”,
“alpn”: [
“http/1.1”
]
}
},
“mux”: {
“enabled”: false,
“concurrency”: -1
}
},
{
“tag”: “direct”,
“protocol”: “freedom”,
“settings”: {}
},
{
“tag”: “block”,
“protocol”: “blackhole”,
“settings”: {
“response”: {
“type”: “http”
}
}
}
],
“routing”: {
“domainStrategy”: “IPIfNonMatch”,
“domainMatcher”: “linear”,
“rules”: [
{
“type”: “field”,
“inboundTag”: [
“api”
],
“outboundTag”: “api”,
“enabled”: true
},
{
“type”: “field”,
“outboundTag”: “proxy”,
“domain”: [
“geosite:google”
],
“enabled”: true
},
{
“type”: “field”,
“outboundTag”: “direct”,
“domain”: [
“domain:example-example.com”,
“domain:example-example2.com”
],
“enabled”: true
},
{
“type”: “field”,
“outboundTag”: “block”,
“domain”: [
“geosite:category-ads-all”
],
“enabled”: true
}
]
}
}
错误日志:
2022/03/28 01:09:32 [Debug] transport/internet: dialing to tcp:x.x.x.x:443
2022/03/28 01:09:32 [Info] [1513145816] proxy/vless/outbound: tunneling request to tcp:play.google.com:443 via x.x.x.x:443
2022/03/28 01:09:32 [Info] [1513145816] app/proxyman/outbound: failed to process outbound traffic > proxy/vless/outbound: connection ends > proxy/vless/outbound: failed to decode response header > proxy/vless/encoding: failed to read response version > read tcp 192.168.0.102:8064->x.x.x.x:443: wsarecv: An existing connection was forcibly closed by the remote host.
2022/03/28 01:09:32 [Info] [1513145816] app/proxyman/inbound: connection ends > proxy/http: connection ends > io: read/write on closed pipe
请问这个应该是哪里出问题了?谢谢!
防火墙问题,或者服务端挂了
我检查了防火墙和服务,应是 ok 的
服务端的端口侦听:
root@ip-172-31-37-74:/home/ubuntu# netstat -ltnp
Active Internet connections (only servers)
Proto Recv-Q Send-Q Local Address Foreign Address State PID/Program name
tcp 0 0 0.0.0.0:80 0.0.0.0:* LISTEN 14742/nginx -g daem
tcp 0 0 0.0.0.0:81 0.0.0.0:* LISTEN 14742/nginx -g daem
tcp 0 0 0.0.0.0:22 0.0.0.0:* LISTEN 1230/sshd
tcp6 0 0 :::80 :::* LISTEN 14742/nginx -g daem
tcp6 0 0 :::22 :::* LISTEN 1230/sshd
tcp6 0 0 :::443 :::* LISTEN 14753/xray
运行一键脚本,显示:
当前状态:已安装 Xray正在运行
查询服务状态,显示:
root@ip-172-31-37-74:/home/ubuntu# systemctl status xray
● xray.service – Xray Service
Loaded: loaded (/etc/systemd/system/xray.service; enabled; vendor preset: enabled)
Active: active (running) since Sun 2022-03-27 16:39:00 UTC; 23h ago
Docs: https://github.com/xtls
Main PID: 14753 (xray)
Tasks: 8
Memory: 7.6M
CPU: 2.743s
CGroup: /system.slice/xray.service
└─14753 /usr/local/bin/xray run -config /usr/local/etc/xray/config.json
Mar 27 16:39:00 ip-172-31-37-74 systemd[1]: Started Xray Service.
Mar 27 16:39:00 ip-172-31-37-74 xray[14753]: Xray 1.5.4 (Xray, Penetrates Everything.) Custom (go1.17.7 li
Mar 27 16:39:00 ip-172-31-37-74 xray[14753]: A unified platform for anti-censorship.
Mar 27 16:39:00 ip-172-31-37-74 xray[14753]: 2022/03/27 16:39:00 [Info] infra/conf/serial: Reading config:
lines 1-15/15 (END)
aws ec2 的防火墙的入站规则也放开了 tcp 443, 80, 81 的端口,从客户端 telnet 443 ,能连上,但立即被断开。
那就是443端口被阻断了
非常谢谢!不知道为什么 443 不行,换了个端口 ok 了。
请问VLESS+TCP+XTLS搭建好后谷歌应用登录不了和挖矿软件依然没办法连接矿池,怎么解决。
不清楚
[Sat Mar 19 02:09:35 EDT 2022] Changed default CA to: https://acme-v02.api.letsencrypt.org/directory
[Sat Mar 19 02:09:35 EDT 2022] Please refer to https://www.gnu.org/software/wget/manual/html_node/Exit-Status.html for error code: 5
[Sat Mar 19 02:09:35 EDT 2022] Can not init api for: https://acme-v02.api.letsencrypt.org/directory.
[Sat Mar 19 02:09:35 EDT 2022] Sleep 10 and retry.
这个怎么处理呢???一直卡在这
换个系统
非常感谢,弄好了
Mar 18 00:36:51 yisu-621affe524321 xray[5590]: 2022/03/18 00:36:51 http: Accept error: accept tcp 127.0.0.1:52047: accept4: too many open files; retrying in 160ms
Mar 18 00:36:51 yisu-621affe524321 xray[5590]: 2022/03/18 00:36:51 http: Accept error: accept tcp 127.0.0.1:52047: accept4: too many open files; retrying in 320ms
Mar 18 00:36:51 yisu-621affe524321 xray[5590]: 2022/03/18 00:36:51 http: Accept error: accept tcp 127.0.0.1:52047: accept4: too many open files; retrying in 5ms
Mar 18 00:36:51 yisu-621affe524321 xray[5590]: 2022/03/18 00:36:51 http: Accept error: accept tcp 127.0.0.1:52047: accept4: too many open files; retrying in 10ms
Mar 18 00:36:51 yisu-621affe524321 xray[5590]: 2022/03/18 00:36:51 http: Accept error: accept tcp 127.0.0.1:52047: accept4: too many open files; retrying in 20ms
Mar 18 00:36:51 yisu-621affe524321 xray[5590]: 2022/03/18 00:36:51 http: Accept error: accept tcp 127.0.0.1:52047: accept4: too many open files; retrying in 40ms
Mar 18 00:36:52 yisu-621affe524321 xray[5590]: 2022/03/18 00:36:52 http: Accept error: accept tcp 127.0.0.1:52047: accept4: too many open files; retrying in 80ms
Mar 18 00:36:52 yisu-621affe524321 xray[5590]: 2022/03/18 00:36:52 http: Accept error: accept tcp 127.0.0.1:52047: accept4: too many open files; retrying in 160ms
Mar 18 00:36:52 yisu-621affe524321 xray[5590]: 2022/03/18 00:36:52 http: Accept error: accept tcp 127.0.0.1:52047: accept4: too many open files; retrying in 320ms
Mar 18 00:36:52 yisu-621affe524321 xray[5590]: 2022/03/18 00:36:52 http: Accept error: accept tcp 127.0.0.1:52047: accept4: too many open files; retrying in 640ms
重启服务器
连接 100多个客户端 后就连不上了 有什么办法不
买个更好一点的服务器
请问下 是加内存 带宽 还是CPU 呢 我这只联到80个机器 就不行了 我的数据不大 就几百B
github.com/v2fly/v2ray-core/v4/common/retry: all retry attempts failed
配置错了,或者服务端防火墙没开
博主你好,我之前没有填SNI,现在把SNI填上后就可以正常科学上网了,谢谢你的指导
SNI怎么获取?
填你解析好的域名