Bitvise是windows平台下一款功能强大的免费ssh客户端,其shell终端可以执行各种Linux命令,还有上传下载文件的终端,以及支持远程桌面连接(要求服务端已安装xrdp)。有了Bitvise,完全可以取代Xshell、putty、winSCP、SSH Secure Shell Client、secureCRT等工具。
备注:更多Windows平台免费SSH客户端可参考:Windows系统免费SSH客户端
Bitvise的官网是 https://www.bitvise.com/ssh-client-download,可从这个页面下载windows安装包。如果官网无法打开或下载速度慢,请点击这个连接下载:BvSshClient-Inst.exe。
Bitvise 主要缺点是没有中文界面,因此本教程介绍Bitvise的安装和使用。
Bitvise教程
安装Bitvise
1. 进 Bitvise官网 ,点击页面中的“Bitvise SSH Client Installer”,保存文件到电脑上。如果官网无法打开或下载速度慢,请从这里高速下载:BvSshClient-Inst.exe。
2. 双击下载的exe文件,弹出的安装界面中勾选“同意条款”,点击下方的“Install”开始安装:
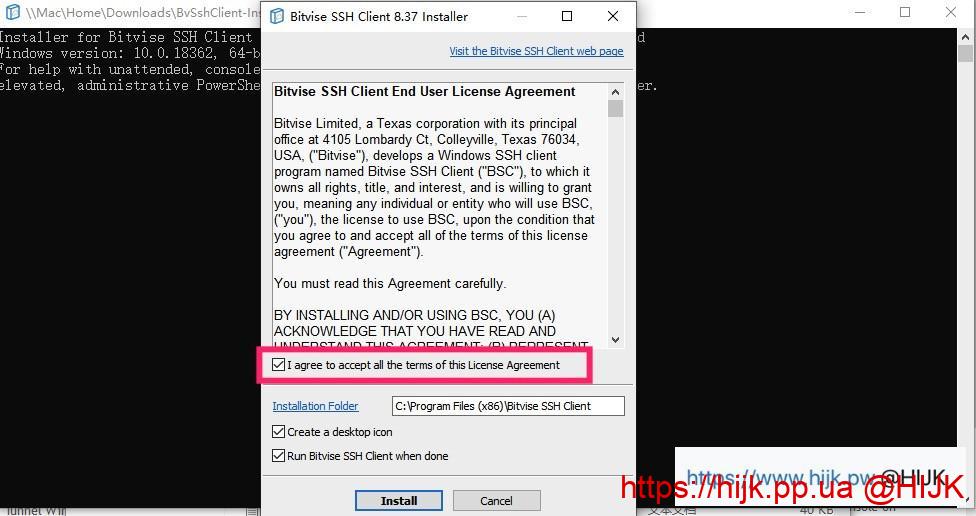
bitvise安装界面
3. 黑框滚动,出现安装的日志,出现如下弹框说明安装成功:
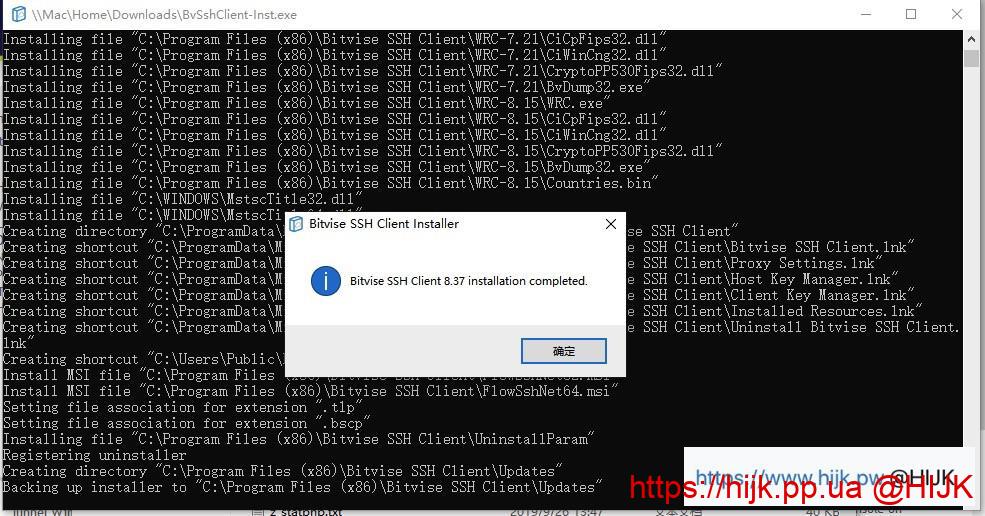
bitvise安装成功
4. 点击确定,安装界面消失,程序自动运行,同时桌面上出现“Bitvise SSH Client”的图标。
到此安装结束,无论使用多少次Bitvise,只需在电脑上安装一次即可。
Bitvise使用密码连接Linux服务器
1. 双击桌面上的Bitvise SSH Client图标,启动程序(首次安装完成后会自动运行):
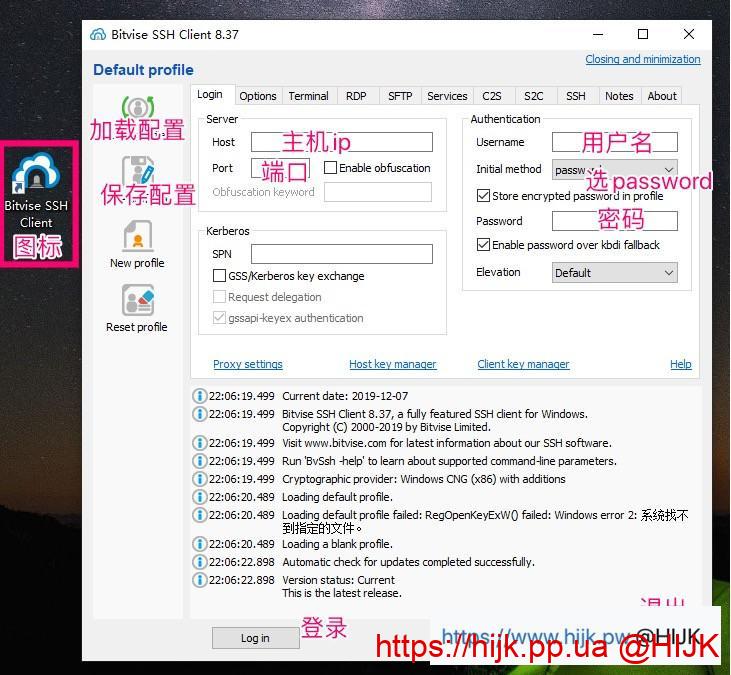
bitvise启动界面
2. 填入服务器的ip、端口号(默认是22,搬瓦工默认不是22,请从后台查看)、用户名(默认是root),”intial method”选“password”,在下面输入框输入密码(服务器密码在管理页面查看),同时勾选“sotre encrypted password in profile”。填好后建议点击左侧的“save profile as”按钮保存配置,下次使用时无需再填写。确认无误后,点击左下角的登录按钮,开始连接服务器。
3. 首次连接服务器会出现主机指纹确认,点击“Accept and Save”:

bitvise主机指纹确认
如果没有出现这个页面,而是提示“由于连接方在一段时间后没有正确大幅或连接的主机没有反应,连接尝试失败”,说明ip被墙或者信息填写错误,请检查ip和端口号是否正确,如果没问题,说明ip被墙了。
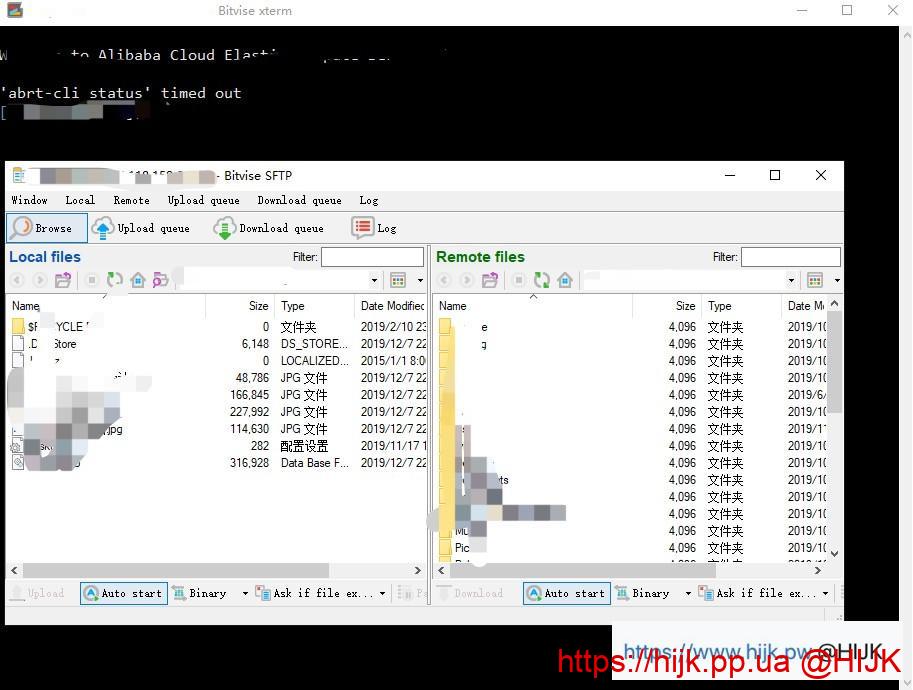
4. 登录成功后,弹出两个窗口:黑乎乎的那个是终端窗口,用来输命令,另外一个像文件夹的是sftp程序,用来上传和下载文件:
bitvise登录成功窗口
如果你不小心把终端或者sftp窗口关闭了,没关系,点击主界面左边的”New terminal console”和”New SFTP window“,就分别又回来了!
5. 接下来,在黑窗口里可以输入各种教程中的shell/bash命令。本站提供以下一键脚本,相关命令请点击教程查看:
注意:终端里无法按 ctrl + v 粘贴,粘贴是点鼠标右键。复制更简单,选中要复制的文字就复制好了。使用过程中命令输错、终端状态不对,或者想中断脚本执行,随时按 ctrl + c。另外,每个命令输完后都要按回车才执行,输入信息也是要按回车才算输入完!
Bitvise密钥登录Linux服务器
某些VPS商家,例如AWS、Google、DMIT等,默认禁用了密码登录,此时需要使用密钥登录到服务器。
密钥登录的操作与密码登录流程基本一致,除了第二步有以下不同:
1. 首先我们要导入密钥。操作为:点击主界面上的Client key manager,然后点击“Import”,选择密钥文件,点击“打开”,最后在弹出来的框中选择Import:
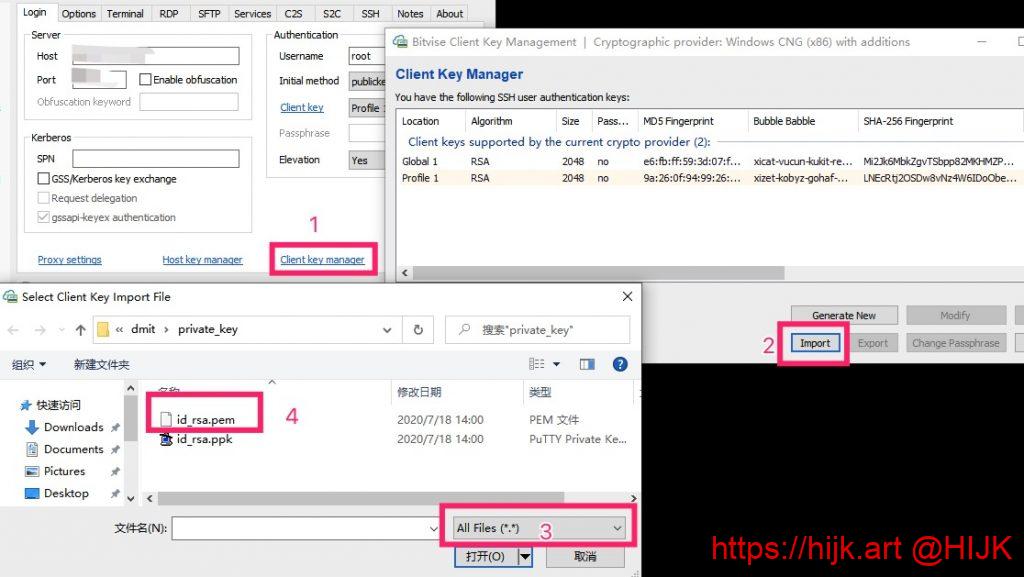
Bitvise导入密钥
2. 登录信息的Initial method选“publickey”,Client key选刚才导入的密钥文件:

Bitvise导入密钥
接下来的操作和步骤请参考上面的密码登录。
文件操作
网上教程需要编辑某个文件,但你不会用vi/vim/nano等命令行编辑器,sftp窗口就派上用场了:sftp窗口左边是你的电脑中的文件,右边是服务器上的文件,你只需要将右边服务器要编辑的文件拖到左边窗口就下载到你的电脑上:
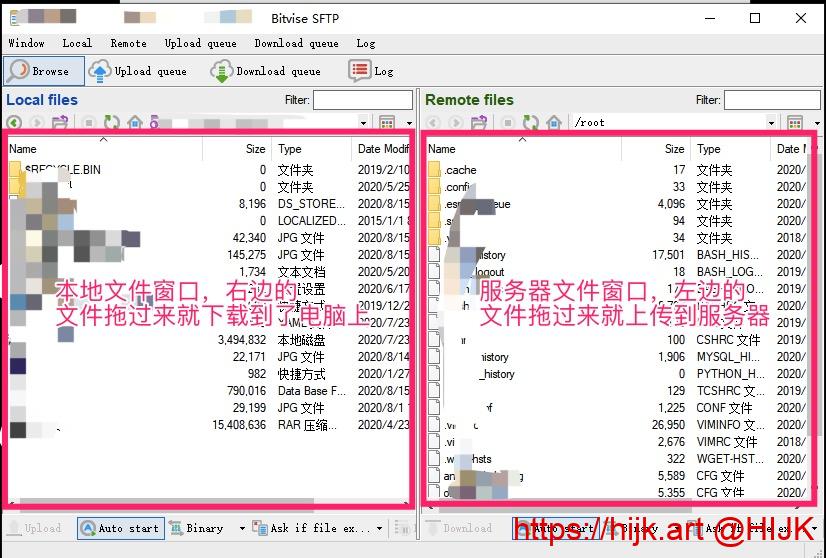
Bitvise上传和下载文件
文件下载下来后,用熟悉的写字板、notepad++、vs code等工具打开编辑,弄好后拖到右边再上传到服务器就行了。
其他
- 点击主界面上的“logout”按钮断开连接;
- 搭建好程序后,无需保持Bitvise登录状态,退出不影响使用;
- 服务端搭建好后,在其他的电脑配置SS/SSR/V2Ray客户端就可以直接用,不用再折腾Bitvise。
有了Bitvise,妈妈再也不用担心不会编辑网上教程中的配置文件了!
编者大佬,我现在的问题是输入了新的ip和密码后出现
started a new SSH session.
Connecting to sSH server 45.32.56.218:22.
Connection established.
然后就没反应了,左边看不到那俩,请问该怎么办呢
可能是服务器的网络不好,或者服务器本身配置不高,很卡
started a new SSH session.
Connecting to sSH server 45.32.56.218:22.Connection aborted on user’s request.
The sSH session has been terminated.
断开当前的连接(点下面的logout按钮),然后输入新的ip和密码
那已经找不到之前的密码了咋办。。服务器被我销毁了(悲)
销毁了就连不过去了啊
emmm,连不过去是不假,可是我新的也登不了了,一直是上面那一串(原谅我的蠢操作
The sSH session has been terminated.started a new SSH session.
Connecting to SSH server 45.32.56.218:22.Connection established.
点了login之后是这样,左边没显示控制台那两个=-=
请问编者,想换一个服务器连接的话如何操作呢,换了个服务器的ip和密码不弹窗了,左边也不显示那两个
18:13:26.302 Current date: 2021-07-07
18:13:26.302 Bitvise SSH Client 8.46, a fully featured SSH client for Windows.
Copyright (C) 2000-2021 by Bitvise Limited.
18:13:26.302 Visit http://www.bitvise.com for latest information about our SSH software.
18:13:26.302 Run ‘BvSsh -help’ to learn about supported command-line parameters.
18:13:26.302 Cryptographic provider: Windows CNG (x86) with additions
18:13:26.493 Version status: Unknown
The status of the currently installed version is unknown because there has not been a recent, successful check for updates.
18:13:26.525 Loading default profile.
18:13:28.101 Started a new SSH session.
18:13:28.101 Connecting to SSH server 207.148.104.61:22.
18:13:29.319 Connection established.
18:15:10.531 Copying log to clipboard succeeded.
18:15:16.809 Copying log to clipboard succeeded.
18:18:58.379 The SSH session has terminated with error. Reason: FlowSocketReader: Error receiving bytes. Windows error 10054: 远程主机强迫关闭了一个现有的连接。.
又过了一会提示了个这个,是IP被墙了吗
ip被墙,或者服务器挂了
18:13:26.302 Current date: 2021-07-07
18:13:26.302 Bitvise SSH Client 8.46, a fully featured SSH client for Windows.
Copyright (C) 2000-2021 by Bitvise Limited.
18:13:26.302 Visit http://www.bitvise.com for latest information about our SSH software.
18:13:26.302 Run ‘BvSsh -help’ to learn about supported command-line parameters.
18:13:26.302 Cryptographic provider: Windows CNG (x86) with additions
18:13:26.493 Version status: Unknown
The status of the currently installed version is unknown because there has not been a recent, successful check for updates.
18:13:26.525 Loading default profile.
18:13:28.101 Started a new SSH session.
18:13:28.101 Connecting to SSH server 207.148.104.61:22.
18:13:29.319 Connection established.
之后就一直无响应,我之前这个节点用了2个月暑假把电脑拆了重新装了一下再连就这样了,请问是什么情况?谢谢
大佬,链接提示:windows10060:由于连接方在一段时间后没有正确答复或连接的主机没有反应,链接尝试失败。 这是怎么回事,正用着突然断了,然后就出了这个提示
ip或者端口填错了,或者ip被墙了
是ip被封了,这已经是今年第二次被封了,难受
请问我一直弹出user authentication是怎么回事?我密码和用户名都是直接复制过去的,应该不存在出错啊
应该是多复制了空格
但是反复核对后并没有发现有多的空格呀
啊抱歉现在终于发现有了,打扰了!!谢谢
connection failed 连接方在一段时间内没有正确的答复或连接主机没有反应 服务器已经购买完了 为什么出现这种情况
ip端口填错了,或者ip被墙了
被墙了在vultr上销毁原服务器再建一个能行吗 还是vultr上的服务器都不行了
vultr上不少ip都有问题,需要新创建一个,能用了再把原来的删了
您好,主机IP是写自己电脑的IP地址,还是买的服务器的IP地址,服务器密码怎么看,看了半天了也没看明白,谢谢啊
填服务器ip,服务器密码一般买的时候自己设置的,或者在网页后台查看
对 我登录了搬瓦工的后台网页 可以看到ip地址和ssh端口 但找不到服务器密码在哪里
密码应该通过邮件发给你了,如果找不到,那就参考教程重置一下吧
怎么看VPS密码
去vps网页后台查看,如果找不到就重置一下vps
今天登录不了,V2RAY显示这个,看不懂。SSH是推荐设置4.
2021/03/13 10:52:56 tcp:127.0.0.1:52547 accepted tcp:content-autofill.googleapis.com:443 [proxy]
2021/03/13 10:53:05 [Warning] [2524108228] v2ray.com/core/app/proxyman/outbound: failed to process outbound traffic > v2ray.com/core/proxy/vmess/outbound: failed to find an available destination > v2ray.com/core/common/retry: [dial tcp 74.120.173.164:12345: connectex: No connection could be made because the target machine actively refused it. dial tcp 74.120.173.164:12345: connectex: A connection attempt failed because the connected party did not properly respond after a period of time, or established connection failed because connected host has failed to respond. dial tcp 74.120.173.164:12345: connectex: No connection could be made because the target machine actively refused it.] > v2ray.com/core/common/retry: all retry attempts failed
2021/03/13 10:53:06 [Warning] [2022558724] v2ray.com/core/app/proxyman/outbound: failed to process outbound traffic > v2ray.com/core/proxy/vmess/outbound: failed to find an available destination > v2ray.com/core/common/retry: [dial tcp 74.120.173.164:12345: connectex: No connection could be made because the target machine actively refused it.] > v2ray.com/core/common/retry: all retry attempts failed
应该是服务器的程序挂了,建议重启服务器,或者运行脚本重新启动v2ray
接受主机指纹后 提示服务器签名验证失败 是怎么回事
服务器什么版本?可能的原因是服务器版本太高,或者密码输错了
服务器是akkocloud在德国服务器 什么版本不太清楚 运行系统是Centos 7 64bit 密码直接黏贴过来的应该没错
那应该是没问题,重新连接试试
在哪里看端口?
默认端口是22,除了搬瓦工这种另类
bitvise官网和高速下载都打不开诶。。。
不可能吧,你家啥网络
Bitvise登陆时显示:远程主机强迫关闭了一个现有的连接,什么情况?
ip/端口填错了,或者ip被墙了
IP和端口对过了,没问题。这两天机子重装了系统,会不会IP被墙了?如果墙了怎么办?
能ping通一半就说明没被墙,如果被墙了要换ip或者用中转
您好,请问一下这个伪装域名怎么获得呀?
花钱买
大佬,vps的密码我的看不到啊,我用的是dmit的,他给我发的邮件说不支持root密码登陆
本站搜dmit教程
你好,问一下,我第一次按照步骤操作后,配置V2ray上不了网,又操作了几遍,现在显示端口被占用该怎么办?
先卸载,然后再运行
ip被墙了,是要换ip了吗
是的
默认用户名是root吗? 密码我修改过,登录服务器后台可以用
基本上都是root,密码是vps的,不是账号密码,如果改过,一般要重启才能生效
user authentication 一直弹验证窗口 ,是密码输入错误吗
用户名或者密码错了
用户名是默认的root吗? 密码我确认可以登录搬瓦工服务器
要怎么获取服务器的账号和密码呢 大佬
不知道就重置吧
已解决,重置初始密码后可以了
20:36:31.598 Automatic check for updates failed: Failed to open URL at “https://bitvise.com/versions/BvSshClient?v=8.38&e=s&l=f”.
The Windows function InternetOpenUrl() failed with the following error: Windows error 12029: The attempt to connect to the server failed.
20:36:31.598 Version status: Unknown
The status of the currently installed version is unknown because there has not been a recent, successful check for updates.
您好,我的bitvise shh安装后出现了这样的选项,如何解决。
这只是一个提示,不用管,不影响正常使用